Share and document your API with Postman Cloud
Foucauld Degeorges7 min read
When working on a project with both an API and a frontend, it’s more convenient to work on both at the same time, as they can influence one another. I was recently working on an API with a mobile development team, and we lost some valuable time asking each other about the format for a certain request, and retyping the same requests for ten-times-a-day operations such as logging in as our test user.
We were using Postman - which you’ve most probably heard of it you’ve worked with or on an API - to run HTTP requests, and keep a history of our past requests. I stopped counting how many times I tried to reuse an obsolete request, got a 4XX-5XX, and thought something was wrong. And one fine morning, I realized that Postman had a Collections tab next to the History tab, and offered cloud storage to save requests and share them with your team.
The whole team sharing thing is a paid feature called Postman Cloud. It costs $5 per active team member per month, with a free 30-day trial period with unlimited users. It offers nice little extras such as auto-generated documentation. In this article, I will walk you through the process of setting up Postman Cloud, keeping and sharing your API requests and documenting your endpoints.
Setup Account and Team
Most Postman users don’t have a Postman account because you don’t need one to use the app. Assuming you’ve installed Postman, the first thing to do is to create your account.
Then, subscribe to Postman Cloud or the free trial period from the Pricing page. Then go to the team page and start adding people to your team. If they already have a Postman account, make sure to use the right email.
Once you have your account set up and confirmed, you can launch the app and log in from the top right corner.
 You’re logged in!
Pro Tip: There is an OSX desktop app (direct download) if you’re on a Mac, which solves a strange window switching issue I had with the Chrome app.
Organize your requests into Collections and Environments
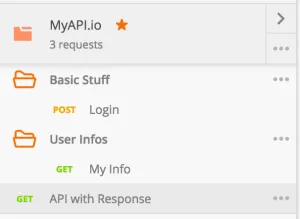
The first thing to notice is that you have a Collections tab on the left menu bar. There, you can create a new Collection. This will hold all your requests for a project. When you are logged in, your Collections are automatically uploaded to your account.
The three dots menu next to the Collection allows you to edit it, share it with your team with read or write access and create a subfolder hierarchy inside your Collection.
Create a new request as usual: choose the method, enter the endpoint, the body and any custom headers. Next to the button that executes your request, there is a “Save” button to save it into a Collection. Give it a meaningful name, choose the collection and possibly a subfolder to save it into, and you’re done! The request is uploaded and shared with the team. They see your Collection just like one of their own (note the self-explanatory “Me” / “Team” filter above the Collections list).
 Your new Collection
Now, you probably worked on more than one server. That’s where Postman Environments come in.
This feature lets you use variables inside your requests and define multiple Environments with their own value for each variable. Environments can be chosen and managed from the menu next to the eye icon at the top right (in the second row of icons). You can create one or more Environments, in which you set a value for a variable called hostname, and use it in your request URL with double curly braces: https://{{hostname}}/endpoint. Then, before running the request, pick an Environment from the menu and Postman will use the correct value. You can also choose to share an Environment with your team, just like the Collection.
Document and Publish your API
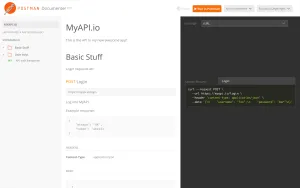
From your Collections page on the Postman website, you can choose to view the documentation for your Collection. This generates a web page which displays your Collection very nicely, with the folder hierarchy, request details and multi-language examples next to one another. On the top right, you can switch between Environments, and the «Run in Postman» button opens the viewer’s Postman app and gives them (readonly) access to your requests so they can try them with one click. Note that for the moment, only the team can see this page.
 Looks nice, right?
Here’s how to make it even better:
- Add helpful descriptions to each request. From Postman, in the three-dots menu next to each saved request, you can edit it and add a description. You can also add a description to each subfolder, and to the Collection itself. You can even unleash the full power of Markdown to make those descriptions look better.
- Give example responses for each request, so that users know what response format(s) to expect. To do this, run your request and get an actual response. Then click “Save Response” button in the top right corner of the response box, and give it a meaningful name (ex: “Normal Response” or “Error Response”). It gets uploaded and shows in the doc just below the request. You can save any number of response per requests.
As you get to production, you can Publish your API reference from your dashboard. If you have multiple Environments, you can choose the one that will be used for the published doc. Publication means that any user with the link can view the documentation, use it and import your Collection to their own Postman using the «Run in Postman» button.
The ultimate example of documented API is the Postman Cloud API itself, which the Postman client uses to sync your Collections. (Yes, it’s an API to store data about APIs :O) As a Postman Cloud user, you can use the “Run in Postman” button to import the doc into Postman, play with it (get the API key from your dashboard) and see for yourself how they created this full-featured API reference.
Areas for Improvement
Here are a few things I believe are most important for Postman Cloud to improve:
- Allow response editing: Before I save a response as a sample response for my documentation, I might need to anonymize the data in the response. I need to be able to edit the response before I save it.
- Clarify teams and organizations: I believe basic team sharing should be free, but as a paid feature I would want to be part of multiple teams within an organization, à la Github.
- Allow me to self-host the doc: Allow me to download or integrate the documentation into my website, or give me more control over the URL of my documentation, and I would look more professionnal when publicizing the link to my users.
- Control public doc change: As the team develops the API, some requests may be shared between them, yet not ready for public consumption. We need a way to prevent specific requests from appearing in the doc, or better, only manually update the public documentation when ready to do so.
Bottom Line
I believe Postman Cloud is a tool that can really make your life easier when building an API, especially when front-end development happens simultaneously (which it should). The price tag may seem odd to a user, but a company can easily administrate a team with a fluctuating number of users. However, the team system deserves some rethinking so that people can be in multiple teams and share different things with different coworkers.
I’ve only used it for two weeks, so I would be happy to hear about your use cases and how well Postman Cloud fits them. Please feel free to comment here or chat with me on Twitter!