Preventing CSRF attacks with Express and AngularJS
Paul Molin5 min read
CSRF vulnerabilities are one of the most common and important flaws in Web applications security. It is listed as the eighth most critical vulnerability in the OWASP Top 10. Symfony2, which we often work with at Theodo, offers cool automatic tools (especially for forms) to protect your applications against such flaws. But when it comes to our applications using Angular and Express, there are things that need to be done.
What are CSRF attacks?
CSRF is the acronym for Cross Site Request Forgery. Those attacks consist in making users of an application send a request the attacker has previously forged.
Let’s say that, in a vulnerable application, some users are able to delete accounts. This action requires specific rights in the application, such as being an admin. The attacker may generate a script whose goal is to send the request “delete the user whose id equals 42” to our application’s server. If the request uses a GET HTTP method, a simple hyperlink might suffice! He will then make an admin of our application send this request by making him go on a website that executes the script. The admin user has either a session or cookies stored in his browser specifying he has the admin role. And thus, when he sends the request, he indeed deletes the account of the user of id 42!
The request does not come from our application, but from another website, thus the Cross Site Request Forgery name. The idea is to prove to our server that the request does not come from foreign websites. We will use a randomly generated token by the server, that will have to be included in the request.
How to prevent it with Express and AngularJS?
It is actually pretty simple, there aren’t as many things to do as there used to be. You’ll have to install a middleware, and tell Express how to use it. Finally you’ll have to tell Express which name the cookie must be given for Angular to recognize it.
The middleware I used is called csurf. It used to be native in Express 3.x, but it is not the case anymore since it moved on to 4.x (almost one year ago). Nevertheless, it is still pretty easy to install. Add the line
"dependencies": {
    ...
    "csurf": "^1.7.0"
},
to your dependencies in your package.json file and then make npm install. You might also directly make ‘npm install —save csurf@1.7.0’
Then, in your main express file, you have to add a few lines to configure the csurf middleware.
csrf = require('csurf');

...

app.use(cookieParser('secretPassword'));
app.use(csrf());
app.use(function(req, res, next) {
  res.cookie('XSRF-TOKEN', req.csrfToken());
  return next();
});
What are these lines for? You tell Express to use csurf that you just required. This must be done after cookie and/or session initialization in order for the middleware to be correctly configured.
Then, you will tell Express that it must write the csrf cookie in the response in the ‘XSRF-TOKEN’ field. This is it. Your app is protected against CSRF attacks. Now, whenever your AngularJs application will send a POST request, it will add a header inside, whose name will be X-XSRF-COOKIE. And the csurf middleware will automatically look for this header and compare it with the value it expects. Csurf expects the token in a header named csrf-token, xcsrf-token, x-csrf-token, or x-csrf-token. Thus, no need to change anything, it’s automatic!
It is important to note that only your POST requests will include this header, therefore your GET requests are not protected. Csurf could also find the token when it is in one ot the two following locations : req.body._csrf or req.query._csrf. This means that if you really want to protect a GET request that you don’t want to use POST method for, you may add the value of the token within the field ‘_csrf’ in your query string.
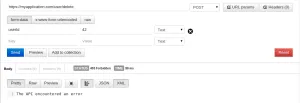
How to be sure it works?
I used the Postman REST Client plugin for Google Chrome. This will help us simulate an attack on the application.
I choose the POST method (as I said, only POST requests are automatically protected), I enter the request URL in the corresponding field (for instance: myapplication.com/user/delete. I then fill in the key/value paired fields with correct pairs, for instance userId as a key, and 42 as the associated value.
I then click on the Send button, and boom! I get a response with a 403 status.
That’s good! Let’s test if the request works when the headers are correctly set now. To do this, I go on the page of my application in which I can really delete the user. I check my cookies (in Google Chrome, press F12, click on Resources and then on Cookies), and I copy the value contained in the cookie named x-xsrf-cookie. In Postman, I click on the Headers (0) button, and I paste the value in the ‘Value’ input. Then, in the ‘Header’ input, I type X-XSRF-COOKIE. I click on Send once again. And, this time it works! The application sent back a correct response with good informations concerning the deleted user, and with a 200 status.

Your app is now more secure, congratulations!